APA Builder Tips address common issues in construction and framing. Save time and money with our tips on proper storage and installation.
Download M300Ver en español
Prevent Buckling with Proper Spacing
APA recommends a 1/8-inch space between panel edge and end joints. Plywood and oriented strand board (OSB), like all wood products, will expand or shrink slightly with changes in moisture content. If the wood structural panels are tightly butted, there is no room for expansion and buckling can occur. That can mean costly, time-consuming callbacks. To assure best performance, follow these panel spacing and nailing recommendations for APA Rated Sheathing, APA Rated Sturd-I-Floor®, and APA Rated Siding.
Spacing Hint: Use a 10d box nail to gauge 1/8-inch spacing between panels. Spacer-type panel edge clips may also be used for roof sheathing applications.
NOTES:
Panel spacing is an APA RECOMMENDATION, to provide installers with a means of minimizing the potential for panel buckling; however, it is not a requirement. Some manufacturers may require a space at the time of installation. Panel buckling may be an aesthetic or serviceability issue but is not a structural deficiency. There is no reason to expect this recommended space to be maintained when the panel becomes acclimated. Gaps that were initially present may have closed due to normal moisture-related expansion. If the flatness of sheathing or flooring panels is acceptable, APA would generally recommend that any finish flooring, siding or roofing be installed as planned regardless of whether gaps are present.
For additional information, visit the APA Resource Library and refer to the following APA publications:
Download Q300Ver en español
Construct a Solid, Squeak-Free Floor System
If not installed properly, floor systems can squeak, buckle, and cause nail-pop. To cut callbacks due to these problems, follow the simple floor construction steps below. APA recommends a glued floor system.
Dry lumber is more dimensionally stable than green lumber. As it dries, green dimension lumber tends to cause nail-pop, making bumps under the finish flooring. These bumps can lead to squeaks and to accelerated wear of the finish flooring. Engineered wood, on the other hand, is dried during production and should not cause nail-pop when properly installed.
APA structural panels are manufactured in a variety of grades and thicknesses. When selecting your floor panel, consider the applied load, joist spacing, finish flooring and floor system (e.g., single floor or subflooring plus underlayment). See Table 1 to select the panel that is best for your job.
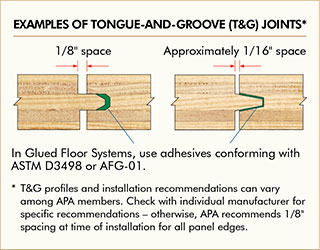
From their initial mill-dry state, panels will expand as they reach their equilibrium moisture content. If they are installed without room to expand, panels may buckle. APA recommends leaving 1/8-inch space at all sheathing and Sturd-I-Floor edge and end joints, including tongue-and-groove joints, unless recommended otherwise by the product manufacturer.
To further minimize the potential for panel buckling, allow panels to acclimatize prior to installation. To do this, stand panels on edge for several days, allowing air circulation to all sides.
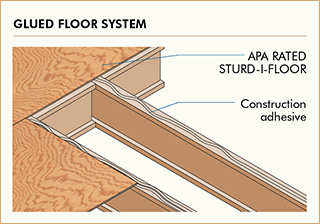
To prevent premature dryout of the adhesive, spread enough glue to lay ONLY one or two panels at a time. To assure the panels will be firmly and permanently secured to the joists, wipe away water, dust and debris before applying glue.
Apply glue (about 1/4-inch-diameter bead) to framing members in a continuous line, or in a serpentine pattern in wide areas. Glue all tongue-and-groove joints by spreading glue in groove. Avoid squeeze-out by applying a thinner line in groove (about 1/8 inch) than on joists.
Complete all nailing of each panel before the glue sets or skins over. Check glue manufacturer's recommendations for allowable time. Remember, warm weather accelerates glue setting.
The correct nail size and spacing for your job depends on your joist spacing and panel thickness, as well as the type of panel product you are using. Attachment schedules and fastener recommendations are provided in Table 1: Panel and Attachment Recommendations.
For other structural wood panel application recommendations and typical panel trademarks, see APA's Engineered Wood Construction Guide, Form E30.
Download S300Ver en español
Minimize Nail Pops
Nail "pop" or "backout" describes the protrusion of nail heads above the surface some time after they were originally driven into the wood (Figure 1). This sometimes happens when green (wet) lumber shrinks because of drying. The nail point stays put while the lumber shrinks along the shank, exposing the nail head.
Repeated wetting and drying of the wood may also cause "cumulative pop" (the nail backs out of the wood incrementally). Staples can also "pop" or "backout" under these conditions.
Five tips to avoiding nail pops.
Use dry lumber or engineered wood framing such as I-joists, trusses, glulam, or structural composite lumber, which is manufactured in a dry condition. Remember that even kiln-dried lumber has enough water left in it to cause some shrinkage.
When attaching plywood underlayment to a subfloor (Figure 2), use nails having a length approximately equal to the total thickness of the subfloor and underlayment layers. If pneumatically driven fasteners are used, foot pressure should be applied near the fastener to assure contact between the underlayment and subfloor. Do not overdrive or underdrive fasteners, which could result in "telegraphing" fastener or panel joint location through resilient tile or sheet flooring.
Use of deformed-shank nails may help reduce cumulative pop. For fastening underlayment, APA recommends ring- or screw-shank nails.
Attach wood structural panel roof or floor sheathing to a clean, level framing surface. If framing hangers or connectors are attached to the top of supporting framing members, shims or furring strips made from wood structural panels may need to be placed between these hardware components, to make the framing surface flush. Otherwise, gaps between the sheathing and framing could result in nail pops when the sheathing is subjected to construction loads or foot traffic.
Download U450
Storage and Handling of APA Trademarked Panels
To assure optimum performance, APA trademarked wood structural panels must be stored and handled properly. Adhering to the panel producer's recommendations or the following guidelines will help protect panels from damage in storage, during shipment, and on the job site.
Handling in Transit
Take precautions to protect panel ends and edges during shipment, especially with tongue-and-groove and shiplap-edged products. If panels are shipped on open truckbeds, cover them with a tarp. For open railcar shipment, use lumber wrap to keep panels dry and clean.
Storage in the Yard and on the Job Site
Whenever possible, store panels under a roof. Keep sanded panels and appearance-grade products away from high traffic areas to prevent damage to surfaces. Use pieces of lumber to weight down the top panel in a stack to reduce warpage from humidity. If moisture absorption is expected, cut steel bands on bundles to prevent edge damage.
Outside Storage
If panels must be stored outside, stack them on a level platform supported by at least three 4x4s to keep them off the ground. Place one 4x4 in the center and the other two 12 to 16 inches from the ends. Never leave panels or the platform in direct contact with the ground.
Cover the stack loosely with plastic sheets or tarps. Anchor the covering at the top of the stack, but keep it open and away from the sides and bottom to ensure good ventilation. Tight coverings prevent air circulation and when exposed to sunlight, may promote mold or mildew.
Download Builder Tips: Storage and Handling of APA Trademarked Panels
(Form U450)
Download N330
APA Panels for Soffit Applications
If not installed properly, floor systems can squeak, buckle, and cause nail-pop. To cut callbacks due to these problems, follow the simple floor construction steps below. APA recommends a glued floor system.
APA trademarked panels can enhance the appearance of almost any roof overhang. Quality APA panels are also an appealing alternative to other materials used in soffit applications. Other advantages include:
- Stiffness and strength
- Lightweight
- Negligible shrinkage, warping, or twisting
- Ease of fabrication and installation
- Availability
There is a variety of APA face grades from which to choose. Selecting the appropriate panel depends primarily on whether the soffit is open or closed.
Recommended spans for open and closed panel soffits are given in Table 1: Panels for Open Soffits and Table 2: Panels for Closed Soffits. The recommendations in Table 1 for open soffits also apply to combined roof/ceiling construction. Panels are assumed continuous over two or more spans with the long dimension or strength axis across supports for both applications. For appearance purposes in open soffit construction, provide adequate blocking, tongue-and-groove edges, or other edge support such as panel clips. Minimum capacities are at least 30 psf live load, plus 10 psf dead load.
For open soffit construction, panels designated Exposure 1 may be used.
Exterior panels should be used for closed soffits (Figure 2). In open and closed soffit construction where Exposure 1 sheathing is used for roof decking, protect panel edges against direct exposure to the weather with fascia trim.
Finishing
Although unsanded and touch-sanded grades of plywood are often used for soffits, optimum appearance and finish performance is achieved by using panels with Medium Density Overlay (MDO), or textured (such as APA 303 Siding) or sanded A-grade faces. Top-quality acrylic latex house paint systems perform best and are the only systems recommended for A-grade faces.
Face checking (separation between fibers parallel to the grain of the face veneer) can be expected on non-overlaid plywood which is exposed to the outdoors, even when finished. If a smooth, check-free surface is desired, use MDO plywood. Surface flaking of some Exposure 1 panels is normal in this application.
Additional Information
For complete plywood or other structural wood panel application recommendations, visit the APA Resource Library and refer to:
- Engineered Wood Construction Guide
(Form E30)
- APA Product Guide: Performance Rated Sidings
(Form E300)
Download Q350
Finishing APA Rated Siding
In addition to structural stability and durability, APA Rated Siding offers the aesthetic appeal of wood. To keep siding looking good and performing well, follow the finishing tips below. Proper finishing protects siding from the weather, reduces maintenance and promotes long-lasting performance. For specific recommendations on finishing APA trademarked products, consult your siding manufacturer or supplier.

Prior to installation, seal all siding edges with a paintable water-repellent preservative if the siding is to be stained, or primer if the siding is to be painted. This will help minimize sudden changes in panel moisture content due to weather fluctuations. Also seal all edges cut during installation.
Weather can cause surface damage to unprotected wood within 4 weeks of exposure and adversely affect the performance of subsequently applied finishes. Preprimed products should be top-coated within 60 to 90 days of installation. Check the siding manufacturer's recommendations.

The best protection for wood siding is an all-acrylic latex house paint system composed of primer and topcoat. Solid-color stain, either latex or oil-based, provides good protection, and semitransparent stains give minimum protection to your panels. APA does not recommend oil-based house paints or latex semitransparent stains on APA Rated Sidings. Clear finishes also are not recommended on APA Rated Sidings exposed outdoors. See Table 1: Recommended Finishes for the best finish for your siding product.
Remove all dirt, mildew and loose wood particles from the siding surface before applying finish. This will ensure that your finish goes on evenly and stays on.
Siding must be dry for oil-based finishes, but may be slightly damp for latex finishes. Do not apply finishes to extremely hot or cold surfaces.
The first coat should either be brush-applied or sprayed and back-brushed while the finish is still wet. This is essential for textured surfaces, such as rough-sawn. Brushing helps work the finish into the siding, therefore providing better protection to the siding surface and optimum finish adhesion.
Follow manufacturer's suggestions as to the best finish for your siding product.
Download K310
How to Minimize Buckling of Asphalt Shingles
Plywood and OSB roof sheathing are the most popular roof sheathing materials in the U.S. for a good reason: they are easy to work with, readily available, and perform the job well. But they must be installed correctly. Improper installation of roof sheathing panels can result in warping, or buckling, of asphalt shingles. Ensure optimum performance of finished roofing by following these recommendations.
Provide roof ventilation according to building codes
(See hints below and figure 1)
Ventilation hints:
- Provide a minimum net free ventilation area of 960 square inches for each 1,000 square feet (1/150th) of ceiling area is required. Net free ventilation area may be reduced to a minimum of 480 square inches for each 1,000 square feet (1/300th) when certain building code provisions are met.(a) Note that these provide the minimum ventilation code requirements, which has been found to be adequate under most normal circumstances.
- Vent exhaust air from kitchens, baths, and laundry to outdoors with vent pipes that run through the roof cavity or attic to roof ventilators. Do not vent exhaust air directly into roof cavity or attic.
- Install baffles providing a minimum of 1 inch of clear space between framing and/or under roof sheathing at eaves to insure that ceiling or roof insulation does not block ventilation paths. For vaulted or cathedral roof construction, provide free ventilation path from eaves to ridge between all rafters.
In cold climates, a vapor retarder on the warm side of the ceiling minimizes the amount of water vapor entering the attic and reduces the ventilation requirements as noted above. Openings in the ceiling created for electrical fixtures and plumbing stacks should be sealed so there is no air leakage between the living area and the attic space. A vapor retarder should also be used on the ground in crawl-space houses
Acclimate panels prior to installation whenever possible and protect sheathing against direct exposure to inclement weather. Store panel bundles on level 4x4 stringers or other supports, so they are not in direct contact with the ground. At least three stringers should be used to support 8-foot panels–one centered and the other two approximately 12 to 16 inches from the ends. Cut banding on panel bundles to prevent edge damage. If plastic sheets or tarps are used, keep them open at the bottom and provide ample space on top and all sides to ensure good air circulation around the panels. Even though the weather will not affect the structural integrity of APA Rated Sheathing, it should be covered when stored outside to keep it clean and to prevent uneven accumulation of moisture. See Storage and Handling of APA Trademarked Panels, Form U450, for more storing and handling tips.
Due to the manufacturing process, sheathing may be very low in moisture content when produced. Because panels will increase in length and width as they absorb moisture from humid air or from rain, it is recommended that panels be spaced 1/8 inch at ends and sides when fastened to framing.
Fasten panels to framing with 8d common nails (0.131 x 2-1/2 inches). Space nails 6 inches o.c. along panel ends and supported edges, 12 inches o.c. along intermediate framing.(b) Place fasteners 3/8-inch from panel edges. Staples may be used in accordance with code approvals for size and spacing. To further minimize unevenness in the sheathing, align framing properly and block any warped framing to ensure panels are smooth and flush at joints. See Prevent Buckling with Proper Spacing, Form M300, for more information on proper spacing.
Standing between supports may bend a panel. Fastening it while bent can "lock" the bent shape into the panel. Although the roof is not harmed structurally, these depressions between the supports can result in an unacceptable appearance.
Store Shingles Standing between supports may bend a panel. Fastening it while bent can "lock" the bent shape into the panel. Although the roof is not harmed structurally, these depressions between the supports can result in an unacceptable appearance.
Install the underlayment felt as soon as practical to avoid direct rain on the panels. Allow panels that get wet to dry before applying felt. Install the felt smoothly, and remove any wrinkles that develop prior to application of the shingles. If the felt is wrinkled, the shingles may not lie flat, causing appearance issues.
Underlayment should conform to ASTM D226 Type I, ASTM D4869 Type I or ASTM D6757. Self-adhering polymer modified bitumen sheet underlayment should conform to ASTM D1970. See Proper Installation of APA Rated Sheathing for Roof Applications, Form N335, for more information on installation.
Postpone application of shingles as long as practical to allow roof sheathing time to acclimate.(c) Sustained high humidity will allow dry panels to equilibrate more rapidly than lower humidity. In order to ensure proper performance of the roof assembly, it is important that asphalt shingles be installed in accordance with the shingle manufacturer's installation recommendations.
Shingles vary considerably in their weight, surface texture and composition. The IBC and IRC require that asphalt shingles meet ASTM D225 or ASTM D3462 standards. Minor surface imperfections in the substrate are more likely to affect the appearance of thin, lightweight, untextured shingles. Consider darker, heavier-weight shingles, including those that are laminated, textured, or varicolored, in order to mask surface imperfections.
Suggestions for repair of roof shingle buckling are provided by shingle manufacturers or the Asphalt Roofing Manufacturers Association.
- See Section R806.2 of the 2015 International Residential Code or Section 1203.2 of the 2015 International Building Code for more details.
- 6 inches when spans are 48 inches or greater. Check building code for proper nail size and spacing requirements in high-wind areas.
- Refer to shingle manufacturer's recommendations.
Download R540
Proper Storage and Handling of Glulam Beams
APA EWS trademarked glued laminated timber (glulam) must be stored properly and handled with care to assure optimum performance. Adhering to the producer's recommendations or the following guidelines will help protect glulam from damage in storage, during shipment and on the job site. When glulam beams leave the mill, they are often protected with sealants, primers or wrappings that are specified in the order. Care must be taken during loading, unloading and transporting as well as in the yard and on the job site to protect the members from damage.
Loading and Unloading
Glulam beams are commonly loaded and unloaded with forklifts. For greater stability and handling safety, place the sides of the beams, rather than the bottoms, flat on the forks (see Figure 1). Carrying extremely long beams on their sides, however, can cause them to flex excessively. To control flex in these cases, use two or more forklifts, lifting in unison. If a crane with slings or chokers is used to load or unload beams, provide adequate blocking at all beam edges between the sling and the members to protect corners and edges. Only fabric slings should be used to lift glulam members. Using spreader bars can reduce the likelihood of damage when lifting long beams. Follow established material handling safety standards in all lifting and moving operations.
Storage in the Yard
A level, well-drained covered storage site is recommended. Keep beams off the ground using lumber blockings, skids or rack systems, as shown in Figures 2 and 3. If the beams are wrapped, the wrapping should be left in place to protect them from moisture, soiling, sunlight and scratches. For long-term storage, cut slits in the bottom of the wrapping to allow ventilation and drainage of any entrapped moisture (see Figure 2). Proper ventilation and drainage will reduce the likelihood of water damage. Center beams on blockings or racks with the load evenly distributed as shown in Figure 2.
Transportation
Stack beams on lumber blocking or skids when loading them on rail cars or trucks. Beams can rest on their sides or bottoms. Secure the load with straps to keep it from shifting. Protect beam edges with "softeners" or wood blocking when strapping down the load.
Storage at the Job Site
If possible, store glulam under cover to protect the beams from moisture, soiling and sunlight. Place the beams on spaced lumber blocking on level, well-drained ground. In many instances, the wrappings can be left intact to protect beams until installation. Seal ends of beams whenever possible after trimming or cutting. Once beams are installed, allow them to gradually season and adjust to the temperature and moisture conditions of the structure. Do not expose glulam members to rapid changes in moisture and temperature, such as may occur from temporary heating units. Such exposure may result in excessive surface checking. See Owner's Guide to Understanding Checks in Glued Laminated Timbers, Form F450 and APA Technical Note: Evaluation of Check Size in Glued Laminated Timber Beams, Form R475, for additional information on checking in glued laminated timber.
Sealants, Primers and Wrappings
Sealants applied to the ends of beams help guard against moisture-penetration and excessive end grain checking. A coat of sealant should be field applied to the ends of beams (see Figure 4) if they are trimmed to length, dapped or otherwise cut after leaving the mill. See APA Technical Note: Field Notching and Drilling of Glued Laminated Timber Beams, Form S560, for additional information on field cutting of glued laminated timber.
Surface sealants, which can be applied to the top, bottom and sides of beams, resist dirt and moisture intrusion and help control checking and grain raising. Specify a paintable penetrating sealant if beams are to be stained or given a natural finish.
A primer coat also helps protect beams from moisture and soiling and provides a paintable surface for subsequent finishing, if specified.
Water-resistant wrappings are often specified to protect beams from moisture, soiling, and surface scratches during transit and job site storage. Because exposure to sunlight can discolor beams, opaque wrappings are recommended. Beams can be wrapped individually, by bundle or by load tarping. In applications where appearance is especially important, individual wrapping should be left intact until installation to minimize exposure to job site conditions.
Download F455
Keep Glulam Looking Its Best with Proper Storage and Handling
Glued laminated timber (Glulam) has an excellent track record for durability and long-term service for structural uses. Like all wood products, glulam beams and columns are subject to the effects of changes in moisture content caused by changes in temperature and relative humidity on the jobsite and after installation. Glulam beams and columns may develop seasoning checks as the moisture content stabilizes from the level at which they were manufactured to their moisture content in-service.
The degree of checking that may occur depends on the combined effects of the initial moisture content, seasonal conditions, handling and storage practices at distribution facilities and jobsites, and the environment after installation. Checking in individual beams or columns will be influenced by how quickly or slowly the moisture content of a glulam member changes from the time of manufacture to the moisture content level in-service.
There are several steps that distributors and builders can take to minimize seasoning checks in glulam that will be exposed to view. If checks do occur, they are primarily a visual concern and can be filled with an elastomeric filler to improve appearance.
Tips for preventing glulam checking
- On the Jobsite:
- Keep beams and columns covered to protect them from direct exposure to sun and rain, especially in hot, dry climates.
- Ensure that there is no direct ground contact or contact with moist or wet surfaces like fresh concrete or wet surfaces.
- Use dry lumber blocking to provide ventilation by elevating beams and columns.
- Keep members wrapped until installation and store them well off the ground with secondary cover.
- Leave protective wrappings intact, but slit on the bottom side to allow for drainage of any entrapped water.
- Apply end sealer when the glulam beam is cut to length at a distribution yard or jobsite.
- After Installation:
- Limit glulam exposure to weather conditions prior to building enclosure by keeping beams and columns covered and protected as long as practical after installation.
- Remove wrapping after installation in the enclosed space so the moisture content of glulam members is allowed to stabilize naturally during construction.
- Avoid rapidly drying glulam members with temporary heating units.
- After the building is enclosed, it is important to reduce the relative humidity gradually.
- Design permanent heating outlets to deflect heat away from glulam members.
- Avoid rapid changes in temperature that can affect the rate of drying during the first full heating cycle.
Taking the steps outlined above will reduce the possibility and severity of checking. It is important to coordinate delivery schedules to minimize jobsite storage. Guard against direct exposure of glulam members to severe conditions like high temperatures, rain, and other damaging weather conditions. Hot/dry and wet/winter climates can create high-risk environments, depending on how quickly the moisture content changes. If high-risk conditions cannot be avoided, take extra precautions in storage and installation to protect the beams and columns.
Glulam manufacturers cannot assure that seasoning checks will not occur in individual glulam members as the result of handling and storage at distribution facilities, job site storage, installation, and regional climatic conditions. To reduce the possibility and severity of checking, it is important to coordinate delivery schedules to minimize job site storage.
Proper Installation of APA Rated Sheathing for Roof Applications
Following these simple construction steps for roof sheathing will provide best performance and minimize complaint callbacks.
This can be done with a straight piece of lumber (6 feet to 10 feet long) or a long carpenter's level. Trusses or rafters should be shimmed as necessary to provide a level nailing surface. If top chords of trusses or rafters are warped or bowed, install blocking to straighten.

Ventilation hints
- Minimum net free ventilation area of 960 square inches for each 1,000 square feet (1/150th) of ceiling area is required. Net free ventilation area may be reduced to a minimum of 480 square inches for each 1,000 square feet (1/300th) when certain building code provisions are met.* Note that these are MINIMUM code requirements, which have been found to be adequate under most normal circumstances.
- Vent exhaust air from kitchens, baths, and laundry to outdoors with vent pipes that run through the roof cavity or attic to roof ventilators. Do not vent exhaust air directly into roof cavity or attic
- Install baffles providing a minimum of 1 inch of clear space between framing and/or under roof sheathing at eaves to insure that ceiling or roof insulation does not block ventilation paths. For vaulted or cathedral roof construction, provide free ventilation path from eaves to ridge between all rafters.
At intermediate supports, fasten panels 12 inches on center. In high wind areas more fasteners may be required. Fasteners should be 3/8 inch from panel ends and 3/8 inch from panel edges (see hints below). For pitched roofs, wear skid-resistant shoes. On panels with a screened surface or skid-resistant coating, install panels with the non-skid surface up.
Fastening hints
- Position panel. Use temporary fasteners at corners if needed to square panel on framing.
- Install fasteners at one panel end.
- Remove temporary fasteners at corners.
- Install intermediate fasteners, starting at panel edge. Use chalk line or straight edge to align fasteners on framing. Fasten panels in rows across the width, continuing this sequence along the length of the panel. This procedure keeps internal stress from accumulating in panels.
- Stand on panel over framing near the fastener location to insure contact with framing while driving fasteners. Fasteners should be driven flush with the panel surface. Avoid standing between framing, which can induce panel deflection.
- For improved performance, consider thicker roof sheathing panels, panel edge clips, or panels with tongue-and-groove edges.
- A 1/8-inch space between adjacent panel end and edge joints is recommended, unless panel manufacturer indicates otherwise. Check building code requirements for installation of panel edge clips. Edge clip requirements depend on the relationship of the panel Span Rating to the actual distance between roof framing.
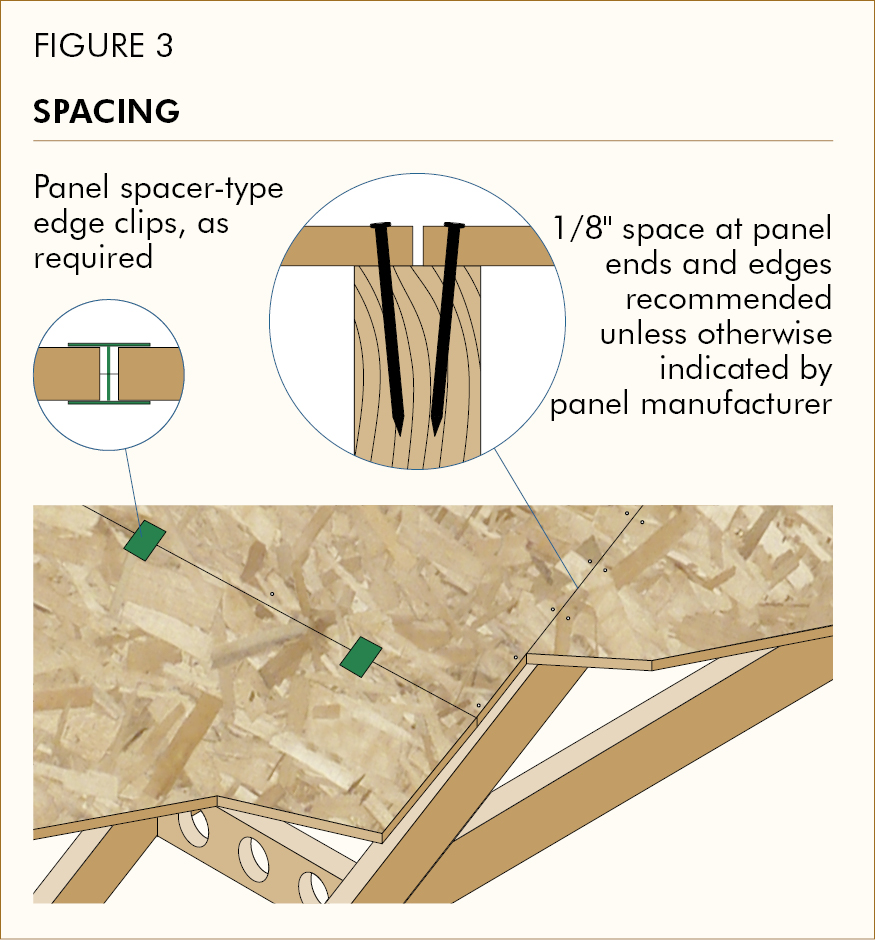
Spacing hints:Use a 10d box (0.128 inch x 3 inches) nail as a spacer to gauge 1/8-inch edge and end spacing between panels. Spacer-type panel edge clips are available from some manufacturers. If necessary, trim panel ends to center on framing.
Roofing hints: Use shingle underlayment felt conforming to ASTM D226 Type I, ASTM D4869 Type I, or ASTM D6757 (Self-adhering polymer modified bitumen sheet underlayment should conform to ASTM D1970) or check roofing manufacturer's recommendations if delays are anticipated during construction. Remove wrinkles and flatten surface of shingle underlayment before installing asphalt or fiberglass shingles.
Shingle hints: If using asphalt or fiberglass shingles, postpone shingle installation as long as possible. This will provide time for roof sheathing to adjust to humidity and moisture conditions. For best appearance, use heavier weight shingles, or laminated or textured shingles. This will mask surface imperfections and reduce the risk of shingle ridging

Additional Information:
For more complete information, visit the APA Resource Library and refer to the following APA publications:
*See Section R806.2 of the 2012 International Residential Code or Section 1203.2 of the 2012 International Building code for more details
Download R340

Proper Handling and Installation of APA Plywood Underlayment
One of the keys to good performance in floors is the right combination of subfloor, underlayment and finish flooring. Plywood Underlayment panels provide a smooth base for carpet, tile or sheet flooring and other types of finish flooring. APA Underlayment also resists dents and punctures from concentrated loads.
APA Rated Sturd-I-Floor® panels are specially designed as combination subfloor-underlayment. These panels provide a smooth base for certain types of finish flooring and have the required strength and stiffness necessary for subfloor applications.
APA Rated Sturd-I-Floor is an excellent base for carpet and pad. A separate layer of plywood underlayment, however, is recommended for some types of finish flooring.
Additional References
For more information, refer to Data File: Installation and Preparation of Plywood Underlayment for Resilient Floor Covering, Form L335.
Tips for working with APA Plywood Underlayment
Always protect plywood underlayment from moisture or damage prior to installation. Before installing, allow underlayment panels to acclimatize by standing them on edge and separating them to permit air circulation for several days in the rooms where they will be installed.
Plywood underlayment should be installed only on a dry subfloor. Inspect the subfloor for evenness along joints and flatness between joists. When necessary, sand the subfloor near joints; install extra blocking and re-fasten the subfloor to flatten uneven areas. Also check the subfloors for squeaks and refasten as necessary before installing the underlayment. Install plywood underlayment smooth side up. To avoid damage to the surface, install underlayment immediately before laying the finish flooring. For maximum stiffness, install underlayment with the face grain perpendicular to floor joists, and offset underlayment panel ends from subfloor panel ends by at least one joist space. All edge joints of the underlayment panels should be offset from the edge joints of the subfloor panels by at least two inches unless otherwise recommended by the finish flooring manufacturer. Space underlayment panels 1/32 inch at ends and edges.
Other Important Considerations
Recommended fasteners and schedules are given in APA's Engineered Wood Construction Guide, Form E30. Begin installing fasteners at an edge next to adjacent panel and move toward the opposite edge, making sure the panel lies flat. Do not overdrive or underdrive fasteners. Overdriving can result in: "telegraphing" fastener or panel joint location through resilient tile or sheet flooring, or floor squeaks due to movement between underlayment and subfloor panels. Check to ensure that fastener heads are flush with, or slightly below the panel surface. Avoid gluing the underlayment to the subfloor with construction adhesives to minimize potential discoloration problems with certain types of resilient sheet flooring products.
Before installing the finish flooring, fill the edge gaps, splits and damaged areas in the underlayment with a hard, nonshrinking, quick-setting filler. (This step may not be necessary under some carpet and structural flooring products. Check the manufacturer's recommendation.) Lightly sand any surface roughness, particularly around fasteners.
When resilient sheet flooring is installed, consider "loose-laid," perimeter-attached flooring products to minimize exposure of plywood underlayment to moisture from water-based adhesives used for installing flooring; or choose premium-quality flooring adhesives with higher solids content and reduced water content and allow maximum "open" time within the manufacturer's recommendations before installing flooring. For other types of finish flooring, follow the flooring manufacturer's recommendations for installation.
Additional Information
For additional information, including selection of Underlayment, installation guide, and fastener recommendations, visit the APA Resource Library and refer to the following APA publications:
Garantiza un rendimiento óptimo siguiendo estos consejos.
Descargar M300LAView in English

Evite el Pandeo con un Espaciado Adecuado
APA recomienda un espacio de 1/8” entre el borde del panel y las uniones finales. La madera contrachapada y los paneles OSB, como todos los productos de madera, se expandirán o encogerán un poco de acuerdo con los cambios en el contenido de humedad. Si los paneles de maderas estructurales están acoplados firmemente no hay espacio para la expansión y se puede presentar el pandeo. Y eso puede significar reclamos costosos que demanden mucho tiempo. Para asegurar los mejores resultados, siga estas recomendaciones con respecto al espaciamiento y clavado de los paneles de clasificación “APA Rated Sheathing,” los pisos de clase Sturd-I-Floor® de APA, y los paneles de clasificación “APA Rated Siding.”
Sugerencia para el espaciado:
Utilice un clavo de caja 10d para medir un espacio de 1/8” entre los paneles. También se pueden utilizar clips tipo espaciadores para las aplicaciones de revestimientos de techo.
NOTAS:
El espaciado de los paneles es una RECOMENDACIÓN DE APA, para proporcionar a los instaladores una manera de reducir al mínimo la posibilidad de pandeo del panel. Sin embargo, no es un requisito. Algunos fabricantes pueden requerir un espacio en el momento de la instalación. El pandeo del panel puede ser un problema estético o funcional, pero no es una deficiencia estructural. No hay razón de esperar que este espacio recomendado se mantenga cuando el panel se haya aclimatado. Las brechas que estuvieron presentes inicialmente pueden haberse cerrado debido a la expansión normal relacionada con la humedad. Si la planicidad de los paneles o revestimientos de pisos es aceptable, APA generalmente recomienda que cualquier acabado de pisos, revestimientos o techos se instale según lo planeado independientemente de si hay brechas.
Para obtener más información, consulte las siguientes publicaciones de la APA:
Descargar Q300LAView in English
Construir un Sistema de Piso Sólido, Libre de Chirridos
Si no se instala correctamente, sistemas de piso pueden chirriar, pandearse, y causar saltado de clavo. Para cortar las llamadas de devoluciones debido a estos problemas, siga los sencillos pasos de construcción de piso hacia abajo. APA recomienda un sistema de piso pegado.

La madera seca es más estable dimensionalmente que la madera verde. A medida que seca, madera verde dimensional tiende causar clavos saltados, causando bultos bajo el piso acabado. Estos bultos pueden provocar chirridos y un desgaste acelerado del suelo acabado. Por otro lado, la madera reconstituida esta secado durante la producción y, si está instalado correctamente, no debe causar saltado de clavos.
Paneles estructurales APA se fabrican en una variedad de grados y gruesos. Al seleccionar el panel de piso, considere la carga aplicada, espacio entre las vigas, pisos de acabado y sistema de piso (por ejemplo, un solo piso o subsuelo más contrapiso). Vea la Tabla 1 para el panel que es mejor para su trabajo

De su inicio estado seco en la fábrica, los paneles se expandirán a medida que llegen a su contenido de humedad de equilibrio. Si están instalados sin espacio para expanderse, los paneles pueden pandearse. APA recomienda dejar un espacio de 1/8 de pulgada en todo revestimiento a los bordes y extremos de Sturd-I-Floor®, incluyendo juntas de machihembrado, a menos que lo contrario sea recomendados por el fabricante del producto.
Para minimizar aún más el potencial pandeo del panel, permiten que los paneles se aclimaten antes de la instalación. Para hacer esto, pare los paneles al borde durante varios días, lo que permitirá la circulación de aire a todas las lados.

Para prevenir el secado prematuro del adhesivo, ponga suficiente pegamento para poner sólo uno o dos paneles a la vez. Para asegurar que los paneles estarán permanentemente y firmemente asegurados a las viguetas, limpie el agua, polvo, y escombros antes de aplicar el pegamento.
Aplique el pegamento (aproximadamente 1/4-pulgada-diámetro de gota) a los miembros estructurales en una línea continua, o en forma de serpentina en zonas amplias. Pegue todas las uniones de machihembrado mediante la difusión de pegamento en la ranura. Evite forzosos mediante la aplicación de una línea más delgada en la ranura (aproximadamente 1/8 de pulgada) que en las viguetas.
Complete todo el clavado de cada panel antes de que se seque el pegamento. Consulte las recomendaciones del fabricante del pegamento para el tiempo permitido. Recuerde, el clima cálido acelera la curación del pegamento.
El tamaño correcto del clavo y el espaciamiento para su trabajo depende en el espacio de las vigas y lo grueso de los paneles, así como el tipo de producto de panel que está utilizando. Recomendaciónes de tamaño y espacios entre sujetas se proporcionan en la Tabla 1.
Para otras recomendaciónes de aplicación de paneles estructurales de madera y marcas de panel típico, vea a APA’s Engineered Wood Construction Guide (Form E30, solamente en inglés).
Descargar S300LAView in English
Los clavos "sobresalientes" o "retirados" describen la protrusión de las cabezas de los clavos sobre la superficie algún tiempo después de que se los colocara originalmente en la madera (Figura 1). Esto ocurre a veces cuando la madera verde (húmeda) se encoge debido al proceso de secado. La punta del clavo permanece en su lugar mientras la madera encoge a lo largo de la caña, y expone la cabeza del clavo.
El humedecimiento y secado repetido de la madera también pueden causar "saltado acumulativo" (el clavo comienza a retirarse de la madera gradualmente). Las grapas también pueden "sobresalir" o "retirarse" en estas condiciones.
Utilice madera seca o madera reconstituida como vigas en I, armaduras ligeras, madera laminada encolada o madera compuesta estructural, que está fabricada en condiciones secas. Recuerde que la madera secada en horno contiene suficiente agua como para provocar cierto encogimiento.
Al fijar la base de piso de madera contrachapada a un contrapiso (Figura 2), usa clavos que tienen una longitud aproximadamente igual al espesor total de las capas de la base de piso y el contrapiso. Si se usan sujetadores accionados neumáticamente, se debe aplicar presión del pie cerca del sujetador para asegurar el contacto entre la base de piso y el contrapiso. No sobreajuste los sujetadores ni los deje demasiado flojos, ya que podría darse la aparición intermitente del sujetador o de la ubicación de la unión del panel a través del piso de baldosas resilientes o el piso en placas.
l uso de clavos con caña deformada puede ayudar a reducir los clavos sobresalientes por presión acumulativa. Para la fijación de la base de piso, APA recomienda clavos con rosca de anillo o rosca de tornillo.
Adhiera los paneles de madera estructural de techos o pisos a una superficie de encuadre limpia y nivelada. Si se conectan ganchos o conectores a la parte superior de los miembros de apoyo del encuadre, se deben colocar viguetas o listones de enrasar hechos de paneles de madera estructural entre estas herramientas, para hacer que la superficie de encuadre esté nivelada. De lo contrario, las brechas entre el recubrimiento y el encuadre pueden causar que los clavos sobresalgan cuando el recubrimiento se someta a cargas de construcción o tráfico.
