Minimize Nail Pops


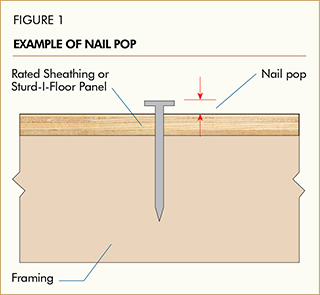
Nail "pop" or "backout" describes the protrusion of nail heads above the surface some time after they were originally driven into the wood (Figure 1). This sometimes happens when green (wet) lumber shrinks because of drying. The nail point stays put while the lumber shrinks along the shank, exposing the nail head.
Repeated wetting and drying of the wood may also cause "cumulative pop" (the nail backs out of the wood incrementally). Staples can also "pop" or "backout" under these conditions.
Tip 1: Choose the correct materials.
Use dry lumber or engineered wood framing such as I-joists, trusses, glulam, or structural composite lumber, which is manufactured in a dry condition. Remember that even kiln-dried lumber has enough water left in it to cause some shrinkage.
Tip 2: Use the proper length of fasteners.
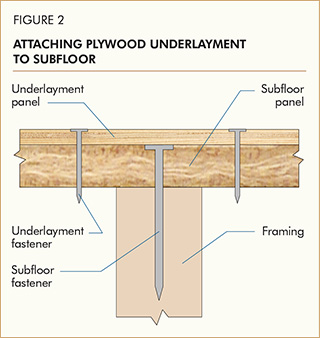
When attaching plywood underlayment to a subfloor (Figure 2), use nails having a length approximately equal to the total thickness of the subfloor and underlayment layers. If pneumatically driven fasteners are used, foot pressure should be applied near the fastener to assure contact between the underlayment and subfloor. Do not overdrive or underdrive fasteners, which could result in "telegraphing" fastener or panel joint location through resilient tile or sheet flooring.
Tip 3: Reduce nail pop.
Use of deformed-shank nails may help reduce cumulative pop. For fastening underlayment, APA recommends ring- or screw-shank nails.
Tip 4: Prepare the framing surface.
Attach wood structural panel roof or floor sheathing to a clean, level framing surface. If framing hangers or connectors are attached to the top of supporting framing members, shims or furring strips made from wood structural panels may need to be placed between these hardware components, to make the framing surface flush. Otherwise, gaps between the sheathing and framing could result in nail pops when the sheathing is subjected to construction loads or foot traffic.
